Saturday, April 30, 2011

Outstanding in her Field ... of Flowers

Sorry!  Couldn't resist that old "farmer joke" ...  Out Standing in Her Field ...of Flowers.
I got so over-excited about how pretty this looked after I washed out all of the blue ink and I wanted to share it with you. This is one of my new Millefiori Brazilian dimensional embroidery designs ... Field of Flowers.
    I stitched it with EdMar's rayon floss in color #227 (Pale Sea Green) on white Trigger cloth (which is the same as Blazer poplin that we all use for our B.E. designs) I used over 4 skeins of Iris, a few strands of Lola and even fewer strands of CirĂ©. I also had some size 11/o seed beads that I sprinkled in here and there.

Well, I'm going to stitch it into a small art quilt later today and will post a picture along with the pictures of the finished Hummy Art Quilt that I completed. I think I've made everyone wait long enough!

But I was so excited about how pretty this design looked (even though it is fairly "busy") that I wanted to share a photo of the embroidery .... outstanding in its "Field of Flowers!"

Monday, April 25, 2011

Kiko Flowers from Sharon Boggon at Pintangle

Many of our Brazilian embroidery stitchers are also crazy quilters. I just saw this lovely flower shared by Sharon Boggon on her Pintangle blog
Be sure to click the link above for all the directions you'll need to stitch this pretty flower on your B.E. designs, your crazy quilts, or on your wearable items. These are just buttonhole stitches plus bullions, but the arrangement makes a really pretty flower petal -- and interesting stitch combinations are something for all of us to dream up when we are working on our embroidery.

I don't have a chance to follow Sharon Boggon's Pintangle blog and her In A Minute Ago website as often as I would like, but definitely recommend all of our Brazilian dimensional embroidery stitchers spend some time there.

Sharon also suggests that we might want to follow some of the links in the comments posted at the end of her blog for even more ideas. Thanks, Sharon, for your wonderful contributions to the world of embroidery. I've added Sharon's blog to interesting places to visit, right over there on the left side of this page.

Wednesday, April 20, 2011

Bob and Bill - Just Passing Through

I thought that a day or two of the dandelions in my back yard was more than enough. So here is a picture of Bill and Bob:
They are Evening Grosbeaks who came to visit the other day: Bill (yes, named for his big beak) and Bob (because of the way they go through sunflower seeds at the bird feeder).
     Here is a picture of Bill, up close, taken from my kitchen window with my little point-and-shoot:
Or maybe it's Bob. 
     Aren't they pretty? I think they passed the word to their birdie cousins that sunflower seeds were being served.

     And when they were finished, the local high wire artist came for leftovers:

Life at my house is never dull.
     For the cats, maybe, but never for me.
...and now I'm going to go and stitch something.

Tuesday, April 19, 2011

Spring Has Sprung . . .

...the grass is riz
I wonder where the flowers is.

I couldn't resist posting this picture and know that if my dandelions are blooming, everything else will be close behind. Actually, this looks like an interesting flower to add to my Brazilian dimensional embroidery!

By the way, the little Hummy Art Quilt is finished and photos taken. I just need to find a minute here or there to post the pictures. I'll be back soon.

Saturday, April 16, 2011

Brazilian Birdies and an Interesting Dimensional Embroidery Stitch Technique

Brazilian Birdies (bet you didn't know there was such a thing!) . . .

You can add these little Brazilian Blue Birdies to any of your embroidery projects or to your crazy quilts or wherever there aren't any cats.
     See how easy they are to make:
Just draw a small circle for the head, a nice plump oval horizontally for the body and stitch with Iris or Glory.  I satin stitched horizontally for the head, vertically for the body and added 2-3 angled straight stitches for the tail feathers.
     If you are feeling really adventurous, you can add a fly-stitch or Glory bullion for a beak and a little size 14/o seed bead for the eye.
     From the detail, you can see that I stitched the birdhouse very simply with Brazilian outline stitch (Z-twist floss held below the line of stitching), and more satin stitches.
     By the way, since Z-twist floss tends to wind itself tighter and tighter as you go around and around (through the fabric), it's always helpful to "unwind" or "twirl" the needle every now and then. Some stitchers will even drop the needle and let the floss untwist naturally. Whatever works...
     If you notice the roofline, it doesn't show a lot, but I try to angle the stitches slightly. They fill the area in nicely and don't give a look of heavy padding to the area.

If you go back to the first picture, you'll see some of the flowers from my book, An Artist's Garden. This is part of the cover design, "Come Into My Flowers":
More information about the book is posted on my in-progress website --uh, oh, Blatant Advertising straight ahead, http://www.millefiori-be.com/.

     The flowers encircling the birdhouse are my lilac with a really neat cast-on technique that I published in our BDEIG Newsletter, The B.E. Wrap-Up, last year. I'll probably add it again here at some point. Also shown is the foxglove stitched with cast-on stitches and a double fly stitch (making the tack first and then slipping a fly stitch through, two times).

But the one I want to share with you now is Star-Fill (originally named 5-Point Star-Filling Stitch and re-named by my stitching friend, Gayl). It's stitched just like those stars we learned how to make in grade school. Here's a graphic:
The star is drawn two times with your needle to fill all the lines, as follows:
Bring needle up at lower left (Point #1).
▪ Needle Path: Numerical Order, #1-10. On completion, each leg of the star will have two parallel straight lines.

▪ To finish, bring floss up next to center. Working on fabric surface, slip needle beneath two star points; pull snug.
▪ Continue to whipstitch 2-3 times around, catching central star lines into a group at center.
▪ Star Center: make a colonial or French knot, or secure a bead, crystal or pearl at center with a tiny backstitch.

See?  Easy as pie!


Sunday, April 10, 2011

A Pansy in Brazilian Dimensional Embroidery

This is my pansy, stitched in Brazilian dimensional embroidery. It's one of the small floral oval designs featured in the book My LadyFlowers (by Yrs Truly, Rosalie Wakefield). Those little background leaves are two fly stitches, one upside down, and the other right-side up. 
      I'm working on my website http://www.millefiori-be.com/ and posting flowers and remembered how much fun it was to design these little floral vignettes.

     The ruffled pansy was inspired by one of my own pansies. When the ruffled pansies first appeared a few years ago, I bought a "nice selection" (meaning almost every one I could find that was a different color/pattern), brought them home, parked them on my picnic table and took a picture of each one. Here is the pansy that inspired the embroidery shown above:
I thought the colors of this pansy were really striking. Here's another picture, of a ruffled pansy (I have forgotten the name of the pansy variety):
Pansies last only until the weather gets really hot here in western Oregon, but that's OK.  It doesn't get really hot until at least mid-June or July. We can plant them very early in the spring and enjoy them for a long time!

Well, while I was uploading my designs (I'm only halfway done), I found a picture of one of the "Jewels" (Millefiori design #911 -- the front cover of the book, My LadyFlowers) that I liked. This design is named Camille and Queen Anne and the Camellia flower features The Comma, a stitch combining a cast-on and a bullion that I developed waaay, waaaaay back in 1993 for the first two tropical flower books that I wrote, Free Spirit and Tropical Breeze.

     Have I been having fun for a LONG time, or what?!

Here's a picture of Camille and Anne:
 By the way, those leaves on the Queen Anne's Lace (also known as Wild Carrot) are something I called "Carrot Feathers". If you look closely, you'll see that I first made a long straight stitch for the stem. Next, I couched long-tailed fly stitches (with a really long tacking stitch), one mirroring another on each side of the stem - making the stem curve when I felt like it.
    
I invite you to come back often and visit my website. I should have everything up fairly soon. Lately, however, my garden has been looking for me to come out and play.

By the way -- most people who live in western Oregon are used to some rainy days (understatement) and lots of overcast days (overstatement), but in today's issue of The Oregonian the headline had an interesting description of "the sun". See:
Ha, ha.  "Scary-Bright Ball."
     Last year The Oregonian, after three months or more of non-stop rain, had a headline in one of the June issues that read: "Dear Rain: You win. Sincerely, Portland."
     ...and it's the rain that makes the flowers grow, so we can't really complain.    

Thursday, April 7, 2011

I Love Lazy Daisies

But before I start ...
I just have to share this picture with you. It's the daphne just outside my front door, in total fragrant bloom, considering that I almost lost it last year -- you can see the nubbins at the left of branches that got nipped in a late frost last year.
      And now that I have had my "flower fix" for the day, I wanted to talk about Brazilian dimensional embroidery and the lazy daisy -- probably my most favorite stitch because it's one of the first stitches my mom taught me when I was little and going through my "Rosalie, please stop making mud pies and embroider a dresser scarf already" phase.

Quite often I offset the start of the lazy daisy stitch (the "a-b" points, as Brazilian embroidery stitchers like to call it). A lot of stitchers already know this, but I feel it decreases bulk at the base of a leaf or petal. Sometimes I REALLY offset those starting points and use one side as the "stem" ...and if you offset the points even more, you can make really pretty tendrils, continuous. Like this, for grapes:
...or watermelon:

Those pictures are from a Millefiori design I did a while back, #829 "Veggie Patch". The idea was to make a design with edible flowers, but some veggies and other yummies just showed up of their own free will.
     I also used the lazy daisy stitch variation that I named "Travelin' Tendril" for Sweet Peas on Millefiori design #949, "Delicate Pleasures":

and for this "Little Sweet Peas" embroidery that I stitched for fun (Actually, another version of this idea was one of the first Brazilian dimensional embroidery designs I ever made):
You can see that those tendrils are just lazy daisy stitches with one side of the stitch a lot longer than the other.
When I offset the lazy daisy stitch and "turn it around" -- start farther away from a stem, I call the tapered stitch a "Reverse LZ DZ", and it also makes an attractive leafy stem. Remember those dresser scarves? The lazy daisy stitches all started at the stem. They looked pretty nice, too, so this is just another way to stitch a stem with leaves. And, of course, if you overlap and offset the lazy daisy stitches slightly as you work along the stem, you won't need to stitch the stem itself. This is an example from one of the flowers on Millefiori design #914 "Lady Belle Pull" that I wrote about the other day:

Those leaves on the right side of the design are stitched without a stem -- ha! fooled your eye! It's an artists' technique called "Trompe l'Oeilor "trick the eye" and is often used for painting murals.
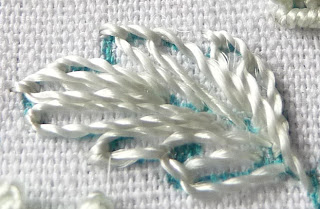
Another useful (and attractive, in my opinion) way to use the lazy daisy stitch is for lobed leaves, such as you see on oak trees and many flowers. I just make side-by-side lazy daisy stitches:
I stitched this leaf with side-by-side lazy daisy (LZ DZ) stitches, overlapping them just slightly. Here's a better picture:


I'm stitching one of my new Millefiori designs, #993 "Field of Flowers" with all-one-color #227 (Pale Sea Green) on white Trigger cloth. The design is very busy, so I wanted to try it in a monochromatic color scheme. I found some pretty size 11 seed beads to match - inside-color pale mint green like these beads by Miyuki:
and I used some size 8 magatama beads (offset hole, like a drop bead but smaller) for variety:
By the way, that blue you see is from my wash-out Marvy pen (metallic point - I Love It!).
     This is the "Field of Flowers" design and I'll try to remember to post a picture of this design when it's finished. I'm thinking about using it to decorate the top of a box, but I haven't planned that far ahead yet.

Thanks for reading. I think I'll go and finish stitching. I still need to do the final hand hemming of my little Hummy Art Quilt so I can show you a picture.
   The sun is out, though, and my garden is calling my name, so I need to get a lot of my inside work done ...and now!
Here is a picture of my garden calling:
Oh, wait! That's Cuthbert. He ALWAYS wants to go outside.
HERE's my garden, calling:

... or a daffodil calling, anyway.